Part of the TWIKE community reaching out to me after destroying TW560 was me being offered to drive TW600. Caroline and I have known each other for a few years now and I’ve been her primary gateway for most questions around her vehicle as we both live in the same (small) village.
During the handover of her TWIKE she asked me: when you’re driving my TWIKE, can you please tell me if there is something you think will fail soon? Are there any sounds you think should worry me?
As I’ve said many times – every TWIKE is different .. completely different to each other – controller variants, software variants, battery chemistry, battery capacity, hardware revisions/versions/upgrades … you name it. And I’m not counting modifications by owners that can range from adventurous (own battery pack design) to practical (heating based on a maritime solution) to downright dangerous (no hints from me!)
This is why I always need some time driving any given TWIKE before I can say anything… after about 500km I got back together with Caroline and told her: overall, your TWIKE is in good shape, except for your drive gear assembly. Something is definitely wrong with it – most probably one of the ball bearings are at the end of their lifespan. This needs to be tended to pretty quickly.
After hearing that a new drive gear assembly with motor would cost upwards of CHF 3000 and an overhaul not much less, she was rather sad, as she had already invested some money in her vehicle early 2018 and didn’t have the budget to do so again this year. At the same time, she really loves driving her TWIKE…so she asked me if there were other options to keep the costs of this repair down.
About 8 years ago TW560 itself had massive problems with the drive gear assembly. As money wasn’t a problem in those days, I had it overhauled by Thomas from Möckli Elektrofahrzeuge and was present as he performed the overhaul. It was a super-interesting process: One of the most invasive procedures you can perform on a TWIKE. This procedure had a lasting positive effect on TW560s in-vehicle sound-scape and made its legendary efficiency possible.
Watching Thomas performing the overhaul I remember telling myself: ‘Could I do this myself, if necessary?’ (this, especially, since I learned from him how to do a road-side tyre repair before leaving to India with my TWIKE and had how to check for defects on the drive shaft and suspension.
A fellow intrepid TWIKE pilot from Germany has a very interesting blog worth your read (if you read German). He calls himself “Grautvornix” – someone who will take on any challenge, no matter how adverse or complicated…and his entries paint a vivid picture of his struggles. His multidisciplinary knowledge of mechanics, electrics and electronics make him an ideal TWIKE owner.
I stumbled across Grautvornix’ blog when I was checking which sites were linking to emissionless.ch/emissionslos.ch: he liked my DRL project and followed the steps and bill of material. His version of TW560’s DRL is very nice and the entry is much more detailed than mine – in my blog entries I usually skip describing the parts I assume are self-explanatory.
One of his projects was a thorough overhaul of a TWIKE’s motor/gear drive assembly. Super detailed with many high-res pictures and warnings.
Back to Caroline telling me that she really hated the idea of mothballing TW600 until she could afford the repair.
I sent her the link to the project page and told her that if she wanted to attempt this repair as a DIY project – I’d be interested in supporting her…and going to the last TWIKE-hardware-related frontier I’ve not yet repaired on my own.
Unsurprisingly, Caroline agreed immediately and told me she was looking forward to this adventure and started sourcing all the parts that would need to be replaced for a full overhaul.
What I like about Caroline is her inquisitive mind, fearlessness towards the unknown and an unstoppable can-do attitude. Might it have something to do with the fact that she is a professional first responder and helps people to survive catastrophic accidents by stitching them back together right there on the tarmac?
I insisted we didn’t do this in my garage – Caroline doesn’t have one – but rather reach out to a professional who would allow us to use his workshop with all the professional tools we might need and thus make our life considerably easier. (…and maybe be of assistance if we get stuck loosening 20-year-old screws or removing failing ball bearings without breaking anything. I knew just the right person and called him – a retired bike/scooter mechanic who has kept his workshop for the odd job for friends. He agreed to be on-site but follow a strict hands-off approach so we could do everything ourselves.
Another important part of preparing for this adventure was to speak with people who already had done this repair (or, even better, had worked on assembling them 20 years ago) – all of them warned me about a multitude of things that could go wrong and gave me invaluable insights into the complexity of a seemingly simple piece of hardware – 1 motor, 3 gears, 6 ball bearings, one gasket.
I no longer thought “how hard can it be?” – I rather thought “how hard will it be?” – eventually, I had exhausted all venues and felt confident enough to give the project the go-ahead from my side.
We set the date – the last day of June 18 and were both really looking forward to this.
Before we continue:
WARNING!
The description below involves
- removing the battery cover – 400V DC will kill you very efficiently
- opening the inverter and removing cables – same 400V DC death trap with the bonus of 230V triple phase AC!
- handling heavy loads – you can get seriously hurt (read on!)
- working on 20-year-old of equipment – any part can spontaneously break of old age, leaving you with an expensive mess and potentially much more work
- not knowing which parts need special care or not applying only specific torque to certain screws – same expensive mess
What follows is not easy – attempt it at your own risk (and only if you know what you’re doing when it comes to AC/DC components) – you have been warned!
With this out-of-the-way – let’s dive in, shall we? (Should you want to do this yourself, I, again, urge you to first read Grautvornix blog post in-depth for many more pics and details on the BOM for replacement parts. And – as always – you may also reach out to me 🙂 ) (BTW: Grautvornix references a blog called atomauto.de which doesn’t exist anymore … als long as you don’t know the WayBackMachine – A parial grab of the site can be found here)
Since Caroline will be arriving right off her shift rushing to accidents in an ambulance and patching people up just enough to be able to be taken back to the hospital (this will come in very handy today!), it’s me driving TW600 to our rent-a-workshop for the day.

In the hour before she arrives I start by gingerly pushing the TWIKE through the door of our workshop that is just 15cm wider than TW600.
With the help of René, our rent-a-mechanic for the day – I push TW600 up two ramps in order to raise it for easier access later on.

I then remove the large battery cover. This gives me access to the TWIKE’s underbelly – as a first step, I want to remove the drive shafts. On the wheel-side they are attached with four screws that might need some cleaning before attempting to loosen them. Loosening might require some friendly insistence – tap the screws with a hammer lightly to get them going.


On the drive gear assembly side there are no screws – the shafts just slot-in. Here again, the shafts might be less than willing to move: some light taps can help. Just make sure to not hit the plate with the screws but rather the metal part closest to the drive assembly.

Now, this TWIKE is not going anywhere anymore 🙂
Then: Disaster strikes.
Somehow, the left tyre starts pushing out one of the ramps and the TWIKE starts moving – I immediately and without thinking step on the ramp and whilst pushing against the TWIKE’s weight, try to bring the TWIKE back to where it has to go.
Bent over, lifting and turning … something in my back snapped and I collapsed on the floor, briefly passing out due to the pain. I regain consciousness quickly and run some basic self checks – everything is painful – including breathing. Although I’m in a pretzel on the floor, I definitely cannot move. Anything involving my back sends sparks of white-hot pain everywhere. Within 5 minutes Caroline arrives … she sees me lying on the floor pale-faced and in visible pain and jumps into her professional self – firing off a series of simple assessment questions to which I only have to answer yes or no. She quickly tells René that we’re not going to be doing anything anymore today and that she was calling an ambulance.
Hearing her calling the first responders describing my status in technical medical terms was oddly reassuring.
With Swiss efficiency the ambulance arrived within 8 minutes of being called. Both first responders ran some checks and determined that there was certainly something wrong but that I also hadn’t broken my back in the layman’s sense. In order to get me back to the hospital, they introduced an IV line and gave me some pretty powerful painkillers – within a few minutes they could start to untangle me and put me on a stretcher.

Long story short – I had fractured a vertebral body. When this happened, my back muscles all had gone into damage limitation mode and now were super-sore and hurting like crazy. I got a nice cocktail of painkillers and was sent home with the doctor saying that there wasn’t much they could do about the fracture and that the muscles would continue to hurt for 3-4 weeks. A complimentary stern warning was delivered by the doctor: ‘You’re not 20 anymore, don’t try to act like it! Take care of your back!’. (I usually feel like 20 🙂 )
Caroline had to wait for another 3 weeks before I was able to reliably stand and sit for a day. We pick up the action here.
René was back for another installment – we first check how the track rod nuts and motor mounting bracket look like.

They all look ok – Caroline starts disconnecting the track rods. It is important to only loosen the nuts on the motor mounting bracket, not the wheel side. As soon as the motor assembly is lowered, re-attach the mounting bracket and track rods – This will allow you to push the TWIKE around without the back wheels pointing in all directions.
I get a seat and start to disconnect the motor from the inverter. (Heed my tips on how to determine if any residual tension is still present in the inverter!)

Make sure you take note of the phase numbers and where the cable was attached by cable ties to on its way to the motor.
Next comes the rev counter cable. There are multiple ways how this cable can be routed. This one is rather clever and goes right to the motor from inside the battery bay.

Be careful with this cable – It is not very flexible and the leads can break easily.

With all the cables detached, it’s time to remove the motor / gear drive assembly.

Please take care to have a lift ready for this part. The Assembly is around 40kg and can seriously hurt you.

Start with the front screw – loosening the chain tightener – in order to be able to remove the chain. Then unscrew the two screws that hold the assembly up on the battery bay.

Now, get your lift in place and push the assembly up ever so slightly. This will make loosening the last two screws with the blue buffers easier and unhooking the motor from the stabilizer much easier.
Then, slowly lower the assembly.

With this done, you’re ready for the real task for today: overhauling the gear drive assembly!

There is no need to unscrew the rev counter probe. We did it and were forced to re-calibrate it later on. An unnecessary waste of time that can be easily avoided. Again, if you keep the counter in place always make sure you’re not putting any weight on to it and the cable.
Now is a good time to drain the oil.
In our case, it is very dark and the magnet on the screw shows massive amounts of metal shavings – something is definitely not how it should be.
To get into the case, we have to remove the chain drive.

Ours only comes off with generous amounts of precisely directed force. I don’t think we would have been able to open it without the specialized tools we had at our disposal!


It’s always a good idea to use these moments to remove any dirt thoroughly.


Caroline doesn’t force the screws – they are a special variant of M4 and are not easily sourced. The case is aluminium and the screws were secured with Loctite – They need quite some insistence until they’re finally all out.

With all screws are gone, don’t just try to drive a screwdriver between the metal parts – there is a small ledge which can be used to carefully push the upper part up just enough to get a blade in. Then cut your way through the leftovers of the sealing compound. This is important, since there is a ball bearing in the upper casing and you don’t want to remove it at an angle and most probably damaging its seat.

Wow, this is it now. Everything looks super-precise. At first glance the 130,000km it has done isn’t visible in any kind of abrasion or usage. René’s experience however, led him to show us where some damage had already been done and told us that we hadn’t found the source of the vast amounts of metal shavings.
We wouldn’t have to wait too long to find the source, however…
Caroline proceeded to remove the intermediate pinion and was able to pull it out without any effort.

This was where the noise and metal came from. Total destruction.


We were shocked to see how little was left over!


We continue taking the assembly apart: differential assembly, gasket ring, leftover of ball bearing and thoroughly wash all of the components with an oily cleaning solution.

With a new ball bearing and after the deep cleanse this part looks like new.

There is not much more satisfying than to see a new ball bearing spinning effortlessly. (Adult fidgetspinner?)
We continue and check the motor ball bearings – all good – they look more or less new and have no mechanical slackness.
Caroline does a very thorough cleaning job. The inside of the assembly looks as if it were new.


Now we replace the gasket ring – it needs special care as it is not made of metal. Best use a sprocket and a piece of wood to coax it back into place.

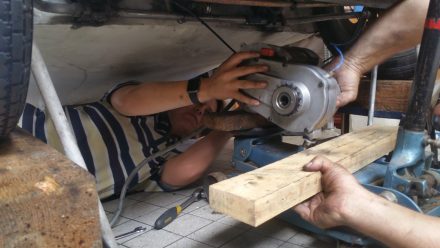
We’ve been pushing the hardest part back a little… How to get the other half of the broken ball bearing off the axle. We tried everything – to no avail.

After letting us expend our energy and try a few routes, René stepped in and told us that there was essentially only one way to do this efficiently: use an angle grinder!

Et voilà – within 5 minutes we had the part off and ready to insert into a replacement.

One of the things we made sure was to replace the main cog’s screws and secure them with Loctite. These screws have been the reason for many a TWIKE’s gear assembly death. As previously mentioned TW560 had a close call with this problem.


Again: Torque, not too little, definitely not too much!

We’re feeling elated – everything is coming together and looks really good!

Another one of the tips I got (which made lots of sense the moment I was told) is to deep freeze parts that need to be slotted into others whilst it makes sense to heat those parts into which things get slotted.

This step demonstrated this powerfully: we could just slot-in the intermediate pinion by hand – no hammer required.

Last ball bearing for today: The second main ball bearing.
Then we add a line of sealing compound around the case and close the cover by tightening the screws very, very carefully. We only applied 7Nm instead of the 10Nm suggested by Grautvornix – this is what TWIKE factory assembly manuals recommend.
Now comes the part we could have saved ourselves: recalibrating the rev counter.
The rev counter sits just above the main gear-wheel and counts the teeth passing beneath it. Too close, and the readings jitter, too far and the inverter doesn’t get any reading at all. There is not much margin – my experience with TW600 shows that it is only about 30° of a revolution between too little and too much.

Calibration can be either done manually by turning on the main sprocket and measuring or directly in the TWIKE when the motor is connected to the inverter. We chose the manual path.
You want a mean voltage of around 7.5V. Be careful not to drive the sensor line with 12V as you will destroy the counter. (black cable)


It took us the better part of 20 minutes to get the counter to an acceptable reading state.
With this done, we’re on the home stretch! Let’s get the assembly back into the TWIKE!


If we’ve learnt something during this process it is that any single time you’re forcing it or using excessive force, you’re doing it wrong.
Take a breath, step back and think – the solution will come how to do it without force.
Important: MAX 5Nm for the two screws holding the bracket to the battery bay!
Don’t re-use Nyloc nuts for the motor plate and track rods – always replace them.
I hook the motor and rev counter back up to the inverter and then we have the first moment of truth: will TW600’s motor spin up and how does the gear assembly sound?
Last thing: mount the drive shafts. Use new screws for attaching the wheel plates.

Give your cardan joints some love in form of cleaning and new lubricant – they will thank you with another 20 years worth of service.

We’re done! Unbelievable – there were moments during the day where we both seriously doubted if we would be able to finish this task within a day. In the end it took us the better part of 8 hours.
Only thing to do now is to get TW600 back down to street level – so to say 🙂

Caroline and I drive back home and it is evident that our work today has had a direct impact: Sound-levels within TW600 are much better than before and, above all, the incessant grinding and scratching sound is gone.
Maybe it would be a good idea for all TWIKEs to have their drivetrains overhauled at 120,000km to ensure a 40-year lifetime?
I must admit that this was fun – If you feel that you could get to the same level of confidence then I urge you to do it yourself – learning about your vehicle is an integral part of owning a TWIKE!
Thanks to all the people who helped making this a full success!