As if my TWIKE wants to be ready for TDST2017, one little thing after the other starts to manifest itself in the last few weeks (spoiler alert: another entry after this one is already lined-up…)
This time it’s the central displays back-light. Unlike previous display problems, which popped-up the first time in India and which originated at Dreifels’ controller (DFC 3.0), this problem is directly linked to the 2×16 character LCD back-light. (yet another spoiler alert: I’m currently writing-up an entry outlining what makes this controller a must-have addition to any TWIKE out there.)
See for yourself how this problem looks like:
Time to queue the music and get working!
First we locate the central console. 🙂

With a fine screwdriver, guitar pick or plastic pry slowly work around the display and start lifting it carefully. Don’t push in too far, since the central console’s PCB is just below the adhesive foil with the buttons and contains surface mounted components that can be damaged if the tool is pushed in too far.
Holding back the central console display you may encounter as many different types of adhesive as TWIKEs and therefore YMMV when removing it.
In the photo below, you can see at least 4 different adhesives sticking to the PCB!

Unplug the cable and take the display to your workbench.

As with my inverter, this part, was also repaired quite some time ago… by the same person 🙂
Luckily, with this problem, locating the source of the problem is rather easy…follow VCC to the display, locate LED back light anode connector, trace back to VCC and you will definitely find a rate-limiting resistor somewhere between these points.

Typically, these old solder points suffer the most in high-temperature-range applications. My display endures being super-heated in direct sunlight and going to super-cold in frozen winter nights (the coldest my TWIKE has been was -25°)

Following the LED anode trace on the LCD daughter board led me to even worse solder points:

I decided to clean all these points, apply new flux and solder and take it from there.

Let’s get some fresh solder on that SMD resistor, shall we?

Testing the newly soldered connections, I found out that the problem wasn’t the solder points but a cracked trace just below the LCD daughter board, before the riser connector. Unable to fix this without de-soldering the display and risking a host of other problems doing so, I chose the most pragmatic solution available…(and a solution I previously used on the upper part of the console)
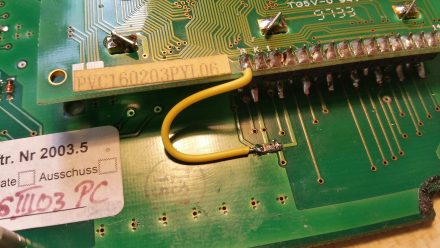
With this hack all connections were fully restored and I was ready to re-assemble the console.

Removing the upper part of the console gives me the chance to completely remove the 4-5 different versions of (old) adhesive previously used to keep the panel in place.
…and sends me down memory lane, when there was a company called TWIKE AG, a Swiss limited company poised for world domination of personal lightweight transport solutions. 😉

After applying a few small dots of hot glue in each corner (did I mention that I just love hot glue? 🙂 ), TW560s display looks grand again…and is permanently illuminated.